recipes

Avocado, Tomato & Cayenne Melt

It's time to lighten things up with a good recipe. I hope the last few posts weren't information overload for you learning how to take sharper photos! So this week we're just going to have fun. I also have an awesome feature coming up on Friday so stay tuned!

This incredibly simple yet delicious open-faced sandwich came from my sweet Grandma, Nola Rae. My Grandma doesn't cook. Not even a little. She was known for always having gum balls, fireballs and candy bars in her purse. At night we'd snack on ice cream bars or frosted root beer floats in her den while watching an old classic movie or playing cards for hours. She tells everyone she never has to cook a day in her life; she's always been cooked for or stopped in at the family-owned restaurant in Mesa called Tia Rosa's. It is so good, I could eat there every day. Let's get back to the sandwich.

One summer while visiting, Grandma made us lunch in her little kitchen. I honestly have no idea where she came up with this idea, but my sisters and my mom and I were blown away by how much we loved it! It is SO easy to make, I almost always have these ingredients on hand and it's pretty healthy. I eat this multiple times a week for lunch. Thanks to my fun-loving Grandma even for just one recipe that I have already shared with many friends and family members. 

Avocado, Tomato and Cayenne Melts - Avocado, Tomato Sandwiches - www.mommatography.com

Avocado Tomato & Cayenne Melt

  • Slices of Bread (I LOVE using the thin-sliced Dave's Killer Bread from Costco)

  • A little mayo 

  • Cayenne pepper

  • Sliced tomatoes

  • Avocado slices

  • Sliced Cheese (I prefer extra-sharp cheddar, you can use any kind)

  • Salt & Pepper

Spread a thin layer of mayo on your bread. Sprinkle some cayenne pepper, depending on how much of a kick you like. If you're not a fan of things spicy, just do a pinch for flavor.  Layer avocado slices and top with 3-4 tomato slices. Sprinkle with salt and pepper and place slices of cheese over the top. Broil on high until the cheese is melted and bubbly, and the edges of the bread are slightly toasted. 

Avocado, Tomato and Cayenne Melts - Avocado, Tomato Sandwiches - www.mommatography.com

Try this using fresh garden tomatoes. It will knock your socks off!! These are just Roma tomatoes; I get so depressed when my tomato plants die and we have to buy them from the store again! 

Avocado, Tomato and Cayenne Melts - Avocado, Tomato Sandwiches - www.mommatography.com

Give them a try and I bet you'll be hooked like I am! 

Avocado, Tomato and Cayenne Melts - Avocado, Tomato Sandwiches - www.mommatography.com
 

The Perfect Healthy Lunch - Quinoa Salad

It's still January and I got myself thinking that I need to find some really great recipes I can use for a quick but healthy lunch. I want to make a big batch of something that I can easily grab that will last me a few days through the week (not giving in and eating the leftover quesadilla from the lunch I made for little ones). Once lunchtime hits and my kids are fed, down for naps, and the house is quiet, the last thing I want to do is spend another thirty minutes in the kitchen making myself a healthy lunch. I want to relax! 

I found this recipe and thought it was the perfect place to start. It is such a great base to make my own variations depending on what I have in my fridge. I didn't have red peppers, so I roasted some red onions with my cauliflower instead and added some avocado slices on the side. I bet it was twice as good with the roasted peppers. I also cheated and used a pre-packaged garlic Quinoa and cooked it according to the stovetop instructions, since I didn't have any on hand. I also used a little less oil in the dressing. There are so many variations you could create with this salad! That's why I love it so much. It was delicious. 

Roasted Quinoa Salad Recipe - www.mommatography.com

Roasted Cauliflower Quinoa Salad:

Serves: 3 to 4 servings

1 medium head cauliflower
1 tablespoon olive oil
¼ teaspoon salt
2 red peppers (see note)
½ cup uncooked quinoa
¼ cup minced cilantro
¼ cup minced fresh parsley
2 tablespoons olive oil
3 tablespoons lime juice
2 tablespoons honey

Directions:
 

  • Preheat the oven to 425˚ F. Cut cauliflower into bite-size pieces and toss with 1 tablespoon olive oil and salt. Place on a baking tray along with whole red peppers (or any other vegetable you'd like to add). Roast and stir occasionally, until the cauliflower is caramelized and peppers charred (about 25-35 mins). Remove from oven and cool slightly. Remove the skin from the pepper and chop.

  • Rinse quinoa and combine with 1 cup water in a medium pot. Bring to a boil, reduce to a simmer, and cook for until water is almost fully absorbed, about 12-15 minutes. Remove from heat, cover and let sit until remaining water is absorbed, about 5 minutes.

  • Combine quinoa, cauliflower, and roasted red pepper in a bowl. Add cilantro and parsley to quinoa mixture.

  • To make dressing, combine olive oil, lime juice, and honey in a jar with liquid. Shake until combined. Pour on salad and toss until combined. Taste and add more salt as desired.

Recipe adapted from Naturally Ella. 

Roasted Quinoa Salad Recipe - Food Photography - www.mommatography.com

All I used photograph this dish was a small white plate, a fork, and an old white shelf I painted white! I used my 50mm lens and shot on f/2.8, 1/350 second, ISO 400 and a custom white balance. I stood on a tall stool to get the the composition for the first photo! 

Photographing food can be pretty simple. I love it. 

Pin the recipe for later!

Roasted Quinoa Salad & Food Photography Tips - www.mommatography.com

Intro to Food Photography & The Perfect Pie Crust

For thanksgiving this year I made three pies; the most I've ever made all at once. My Granddad is famous for his pie making skills and my Dad has carried on the tradition. I have a lot to live up to in the pie world, but I love making them and they are easily one of my favorite desserts! 

When I want to photograph food, I think first about what I want my surface to be and what kind of background or backdrop I want in my photo; getting these right will compliment the subject matter. You could say I'm more of a minimalist when I shoot; I start with the key parts of my photo and selectively add a few props in as I go. I shot these using only natural light, with a wooden box as my table and my sweet mother in law holding the backdrop behind me. I'll include what settings I used which hopefully will be helpful for you. 

Food Photography Tips - www.mommatography.com

F/2.8, 1/100, ISO 3200

Food Photography Tips - www.mommatography.com

F/2.8, 1/100, ISO 3200             For the rest of the images I used F/2.8, 1/125, ISO 2500

Food Photography Tips - www.mommatography.com

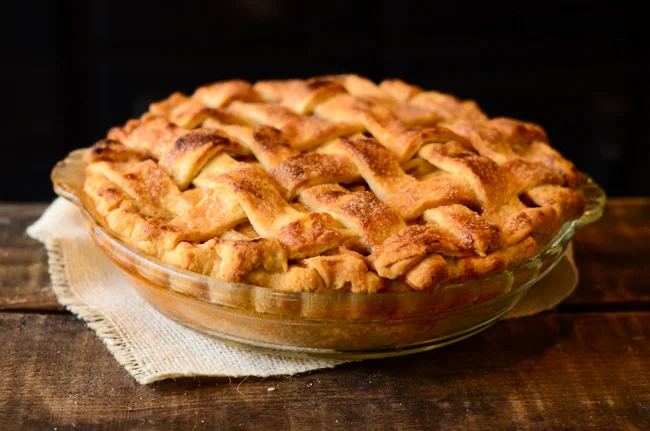
Watch my Facebook page (like us if you haven't already!) and instagram (@mommatography) for my favorite Apple Pie recipe on an upcoming feature! It's amazing, if you can't tell from that glaze. 

Food Photography Tips - The Perfect Pie Crust - www.mommatography.com
Food Photography Tips - Choose your lighting carefully - www.mommatography.com

Make sure you are aware of your lighting when photographing. For the photo on the left, the tungsten lights in my kitchen were on. Shooting with the lights on will make your photos warmer since the tungsten light is more yellow. Mixed lighting can make it hard to get your white balance to look good. I turned the lights off for the photo on the right and just used the natural light from my door. I prefer just using natural light in most cases; it's not as harsh and the tungsten light made my pies way too orange. I use my Kelvin scale to set my white balance; we will cover more about white balance soon. 

For this image below I actually liked the warmer tones from having my lights on. It made it look a little more golden, and who doesn't want to dive into a pie that is perfectly golden brown with a sugar glazed crust! I shot all of these using my 50mm f/1.8 lens. I love this lens for food photography. 

Food Photography Tips - www.mommatography.com

Play around with different color themes, textures and props. For this pie I just used a piece of burlap underneath it. Sometimes your closest thrift store is the best place to look for props; old pans, colorful dishes and plates, vintage forks and knives, towels and placemats. I love searching for new props. Antique stores are great too. Notice the difference my background makes in both of these photos below; one is light and makes a nice bright scene and the dark one really draws the focus in on the pie. I like both of them, but the mood is completely different. Check back soon for products & supplies I recommend for shooting food, products and portraits at home. 

Food Photography Tips - www.mommatography.com

My Recipe & Tips for the Perfect Pie Crust:

  • 1 1/2 cups all-purpose flour

  • 1/4 tsp salt

  • 1/2 c. and 2 TBS butter (very cold) 

  • 1/4 c. and 2 TBS ice water

In a mixing bowl, combine the flour and the salt. Use a knife to dice up the chilled butter, then using a pastry cutter, cut the butter into the flour until it resembles coarse crumbs. Add the ice water one tablespoon at a time, being careful not to get the dough too wet. Continue this process until it forms a ball. With pie crust, it's important not to overwork the dough (like kneading bread dough). You want the bits of butter to stay cold. Refrigerating the dough for a few hours or over night will help when rolling and shaping your pie crust. Allow the crust to sit out from the fridge for at least 30 minutes before rolling, or it's tough to roll out. I roll my dough once, fold in the edges to form a ball and then roll it out again to make a perfect circle. 

Use your rolling pin to roll the pie crust up and place it easily in your pie pan. I then fold over the lip of the crust along the edges to make it thicker, and (see the images above) using my knuckle, shape the crimps into the crust. 

Recipe adapted from here.

My girls were pretty busy making their own beds out of rugs and backdrops while they waited for the pies to finish cooking. They will find anything to use as a blanket these days! Maybe I shouldn't have them running around in just diapers in November :) Funny things happen when mom is busy cooking and taking photos in the kitchen... 


DIY Lego Gummies

This weekend we threw a Star Wars themed birthday party for my little guy; I cannot believe I have a five year old! The party was a huge success and we had a lot of fun with it. I thought it would be a perfect time to post a recipe for a really fun project for kids (or adults, let's be honest, these are pretty sweet)! I will also combine everything we've learned about aperture, shutter speed and ISO and give you some examples of how I shot some photos of these awesome edible legos. Legos always seem to find their way into kids mouths and these ones you can actually eat while you stack them and play! They turned out awesome.

DIY Lego Gummies - www.mommatography.com

All you need for this recipe is three key ingredients, and your lego molds.

Lego & Star Wars Gummy Molds

We bought ours here on amazon. We also got a star wars pack, which were seriously the coolest. It was also convenient to have squeezable condiment bottles like these, to help pour the hot liquid into the molds. Here are the ingredients you need: 

  • Jell-0

  • Karo corn syrup

  • Unflavored gelatine (The small Knox box comes with 4 packets)

  • Water

  • Silicone lego mold

In a measuring cup, combine 1/2 cup cold water with 1/4 cup corn syrup. Stir to dissolve and pour into a pot on the stove. Don't turn on heat yet. Add 2 packets of unflavored gelatin and mix in your packet of Jell-O. Stir it slowly with a whisk to let it all set in. Set your stove to medium heat and stir every minute or two for 5-10 minutes. When the gelatin is completely liquified, the syrup is ready to pour into the molds. It will be very hot, so be careful not to spill. If you have bubbles or gelatin lumps, you may pour the liquid into a heat-resistance container and scrape the bubbles/lumps off the top, and then pour into your molds. If you have bubbles that rise to the top of the molds, you can scrape off the bubbles there as well to make your gummies turn out more smooth. Allow at least five hours to set.

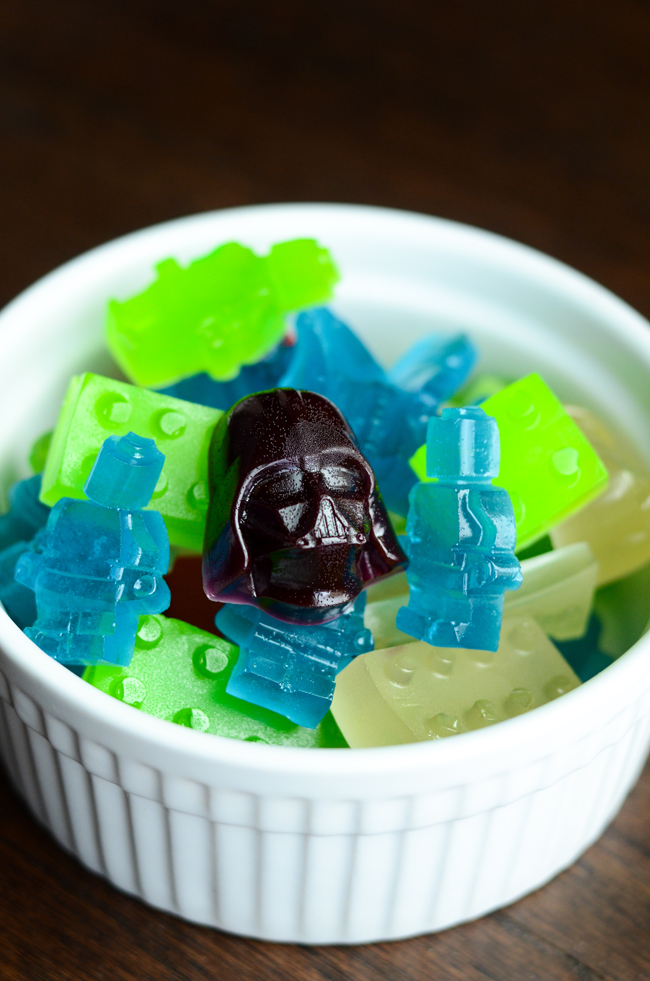
I didn't get to photograph the process because we made these at 1:30 AM (crazy I know, the life of a parent). For the lego molds above and this image below I shot with my 50mm f/1.8 lens and these were my settings: aperture: f/3.2, shutter speed: 1/200, ISO: 800. I always try to shoot close to natural window light, and use a shallow depth of field to get the background to blur and bring the focus in on the details of the food or product I am shooting. I shot on my hardwood floor, and in Lightroom (my editing software) added some contrast and darkened the edges of the photo a little bit to make the subject pop. 

DIY Lego Gummy Molds - www.mommatography.com

If you want to see more about the gummy legos, like how to make them interlocking, check out the instructions here. We made five different batches to get a variety of colors for the kids to play with. 

The gummies come out of the molds really easily, and the details are perfect! For these images I shot right in front of my sliding glass door. My settings were aperture: f/3.2, shutter speed: 1/125, ISO: 1250. 

DIY Star Wars Candy - www.mommatography.com
DIY Star Wars Gummy Candy - www.mommatography.com

Keep practicing changing your aperture and shutter speed, either on Aperture Priority, Shutter Priority, or be really brave and give Manual Mode a try! On Manual you will select all of your settings, Aperture, Shutter Speed and ISO. It takes a little time to catch on to switching all three settings for one shot, but I promise you will love it once you get it!