Editing Tips

Sorting Photos & Creating Favorites in Lightroom

Today we're taking a trip back to learning more about Lightroom! Specifically, how to sort, rate and label your photos as favorites to make it easy on you to find and edit only the photos you pick. Be sure to read my first article about importing and organizing your photos in Lightroom here! This will help you import correctly and make sure your library is clean and correct. 

One of the greatest benefits of Lightroom is not only do you have powerful editing tools, but you can store, sort and organize all of your photos in ONE place. You don't have to use Bridge to organize, and Photoshop to edit. LIGHTROOM gives you an all-in-one option. This is why I love it.

When I import a batch of photos through Lightroom, my next step is to sort through my photos and somehow label my favorites for further editing. Maybe you want to filter and label your photos by a certain location you were in, one specific event you imported or photos of only one of your kids. Lightroom makes this process SO simple! You can work with color labels, star ratings and flags. I like to flag the photos I want to edit. I'll go through all three processes with you and explain how to view ONLY those photos. 

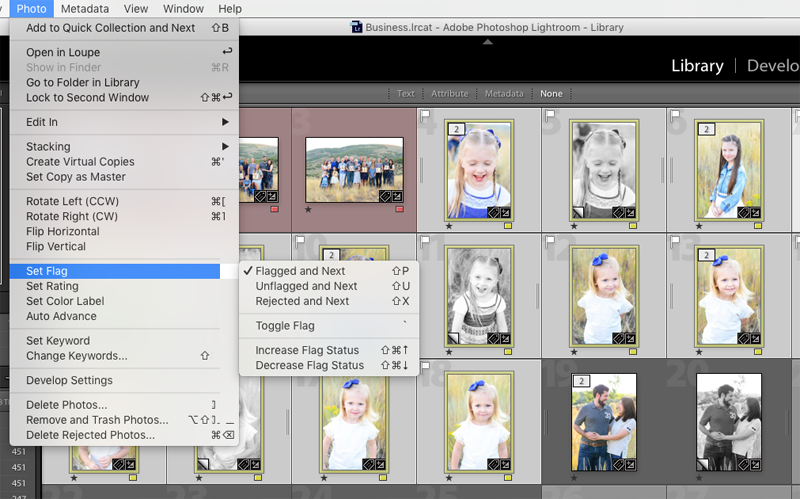
This image above shows my Library module, and you'll see that you can go to View-Sort- and choose how to view your photos based on this favorite system. Right now they are set to sort by Rating, but we can easily switch to your flagged Pick and Label Color

How to Flag Photos in Lightroom 

  1. While clicking through photos, the shortcut to label a photo is the letter P. It will show you it's been flagged as a Pick.

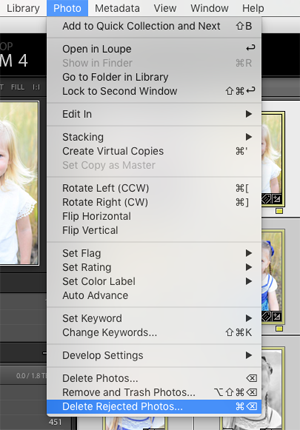
  2. If I don't like the photo and want to delete it eventually, you can hit X to reject the photo. 

How to Star (Rate) Photos in Lightroom 

  1. This is simple to remember, hit numbers 1-5 to set the number of stars you want to label photos. For example, if I want a five star label I'll just press the number 5. 

  2. If you want to get rid of a rating, just hit 0 to reset the rating to zero. 

How to set Color Labels in Lightroom 

  1. Color labels start with the number six; 6-Red, 7-Yellow, 8-Green, 9-Blue and so forth. Simple press the number associated with the color label you'd like. These color labels might be helpful to organize photos into certain groupings for your to do list. Maybe red means keep it, and yellow means you want to print that photo. 

This screen shot below shows that I selected to view my photos by Color Label. I then clicked to my Develop module, and you'll see that it sorted my photos by red first, and then yellow labeled photos. 

I can also select multiple photos in my Library module and go to Photo-Set Flag, Set Rating or Set Color-Label to assign my favorites all at once. See my example below. 

Back to the idea of rejecting photos: if you go to your menu and click Photo, at the bottom of this drop-down menu, you can delete your rejected photos. Lightroom gives you a choice to Delete from Disk (delete them forever) or just Remove them from your Lightroom catalogue. For me, if I don't want the photos, I like to delete them from my disk so they aren't cluttering my computer and taking up space. 

Hopefully you understand now that you can get to your favorite photos quicker and easier using these different sorting tools that Lightroom has to offer! I love how fast I can narrow down photos with these simple labeling tools. Try it out and see what works best for you. 


Free Lightroom Preset - The Perfect Black & White

To all my Lightroom users out there, I've got a gift for you today. I'm sharing my favorite preset for converting photos to black and white! Black and white conversion can sometimes be more complicated than you hoped for. It seems simple enough, but it's easy to overdo it and you're left frustrated with an unsaturated photo that says.... BLAH.  

This preset will be your new best friend. I use this ALL the time, especially for portraiture. It is light and keeps things subtle and natural; it is definitely my go to for black and white conversion and I love it.

Every so often I will use this preset and add slightly more contrast. Try it out and see how you like it!

Click here for the free Lightroom Preset! 

Instructions:

  1. Click the link to automatically download the .lrtemplate file. 

  2. Find the file that was downloaded and save it to your desktop.

  3. Go to your Lightroom window and find your presets menu on the left. Ctrl+Click (right click) on the preset menu and click Import (see the image below).

  4. Locate your file and press Import to upload it into Lightroom. Lightroom will store it for you, so you can now delete the file or save it as a backup!

Here's another example of how lovely this black and white preset is!

Have a HAPPY MONDAY! 

PIN IT!


How to Correct Your White Balance in Post-Processing

White balance can make or break an image. It is really important to try and get your white balance right in camera, when you take your photo. I have covered the basics about setting your white balance in this article; if you haven't read it be sure to! It will help you understand what it is and why it is so important to getting a great image.  

Once in a while we're in a tough situation and we end up shooting without selecting the best white balance option, leaving us with a very BLUE image or an image that is so ORANGE, it's scary! The good news is that it is easy to fix your white balance in post-processing. I'm going to walk you through how to do this in both Lightroom and Photoshop.

Here's an example of a photo I took and didn't like the White Balance. Not even a little bit.

If you compare it to the shot below where I used a custom white balance setting, you'll notice it looks much more inviting and not yucky orange. Luckily, I made the correction IN CAMERA, which is always best... BUT I'll teach you how to fix a photo if you're stuck with a color cast you don't like! 

Step One

Find your white balance dropper tool. It looks like this below, on the top is Lightroom and the bottom is the top toolbar in camera RAW in Photoshop. 

Use this tool to find and click on a neutral area in your image (any area that is white, black or gray). This will automatically adjust your white balance settings; try a few different neutral areas and see which one is the closest to the light & setting you took the photo in. 

Another trick to picking a good neutral for your dropper tool is to watch the numbers in the box below (RGB) and try to get these three values to be as close as possible for the best results. 

This is the result below from picking a neutral in my image above. It's still a little green and a little yellow, so check the next step below to get it just right!

Step Two

In most cases, you'll want to make smaller adjustments by using your white balance sliders to fine-tune the image. Check the toolbars below:

Play around with the temperature sliders to get your white balance exactly where you want it. Here's a finished image after using my temperature and tint sliders to get it where I wanted it. This is where I got my first YUCKY orange image! Doesn't it look a whole lot better?

Step Three

If you're not getting the results you want, you can try to choose a pre-selected white balance setting that fits your image. For example, select from the drop-down menu below to choose 'shade' if you shot in the shade, and see what it does for you. You'll only have these options if you shot in RAW. If you didn't, you'll have an Auto setting. 

The Auto setting did a pretty good job for the image below! It was too cool for me, and just selecting the Auto option warmed it up great. That's the only thing I clicked to get it from the image on the left to the image on the right. Try it out and see if it gets you closer to where you want to be.

I hope these White Balance tools can help you get your images where you want them to be, even if you rush and choose the incorrect settings in camera! The more you practice and play around with it, the easier it gets to fine-tune your White Balance and get the most natural looking photos. 

GOOD LUCK!


Simple Editing in Lightroom - Video Tutorial

Check out my quick video walk-through of how I edited this portrait! It doesn't take much to make your photos pop. Learn how to get this look in Lightroom by following my easy tutorial! 

Here's the Video Tutorial:


How to Import Photos Into Lightroom - Staying Organized

I can't believe it's June 1st! I love the month of June; it means summer is here, my birthday is coming up and it's time for a lot of baseball and barbecues. This also means MORE photos of everyday life. How can we keep track of and organize thousands of photos? Lightroom!

I've realized that by teaching about Lightroom, I myself need to get even more organized with my photo library! If you haven't read my first post about a quick intro to Lightroom, read it first. In Lightroom, it is important to get a good system going right from the import. I made a quick video walk through for you to understand your options when importing photos in Lightroom. This tutorial will help you to add keywords to find photos easily in the future. It will also help you name your files and establish a good system to make your life easier when it comes to organizing your photos!

Check it out!

For some reason part of my window got trimmed, so I hope you can follow along okay! The most important things to remember when importing are:

  • Rename your files so they are easy to understand and find.

  • Select the destination folder on your hard drive where you want to store your photos (I don't do it by date. Trying to remember what I shot in April of 2015 isn't convenient for me. I like to name my folders by event). Under organize, I choose 'into one folder' as you can see below. If you prefer to have your folders labeled by date, you can choose 'by date' instead. 

  • Add keywords to your images to help you find them in the future. 

I hope you find Lightroom's system of organizing photos easy and helpful like I do! It is almost impossible to not get overwhelmed by the amount of photos we take these days. Don't add extra stress in your life by throwing your photos on your computer without a good system to stay organized!