Lightroom

Sorting Photos & Creating Favorites in Lightroom

Today we're taking a trip back to learning more about Lightroom! Specifically, how to sort, rate and label your photos as favorites to make it easy on you to find and edit only the photos you pick. Be sure to read my first article about importing and organizing your photos in Lightroom here! This will help you import correctly and make sure your library is clean and correct. 

One of the greatest benefits of Lightroom is not only do you have powerful editing tools, but you can store, sort and organize all of your photos in ONE place. You don't have to use Bridge to organize, and Photoshop to edit. LIGHTROOM gives you an all-in-one option. This is why I love it.

When I import a batch of photos through Lightroom, my next step is to sort through my photos and somehow label my favorites for further editing. Maybe you want to filter and label your photos by a certain location you were in, one specific event you imported or photos of only one of your kids. Lightroom makes this process SO simple! You can work with color labels, star ratings and flags. I like to flag the photos I want to edit. I'll go through all three processes with you and explain how to view ONLY those photos. 

This image above shows my Library module, and you'll see that you can go to View-Sort- and choose how to view your photos based on this favorite system. Right now they are set to sort by Rating, but we can easily switch to your flagged Pick and Label Color

How to Flag Photos in Lightroom 

  1. While clicking through photos, the shortcut to label a photo is the letter P. It will show you it's been flagged as a Pick.

  2. If I don't like the photo and want to delete it eventually, you can hit X to reject the photo. 

How to Star (Rate) Photos in Lightroom 

  1. This is simple to remember, hit numbers 1-5 to set the number of stars you want to label photos. For example, if I want a five star label I'll just press the number 5. 

  2. If you want to get rid of a rating, just hit 0 to reset the rating to zero. 

How to set Color Labels in Lightroom 

  1. Color labels start with the number six; 6-Red, 7-Yellow, 8-Green, 9-Blue and so forth. Simple press the number associated with the color label you'd like. These color labels might be helpful to organize photos into certain groupings for your to do list. Maybe red means keep it, and yellow means you want to print that photo. 

This screen shot below shows that I selected to view my photos by Color Label. I then clicked to my Develop module, and you'll see that it sorted my photos by red first, and then yellow labeled photos. 

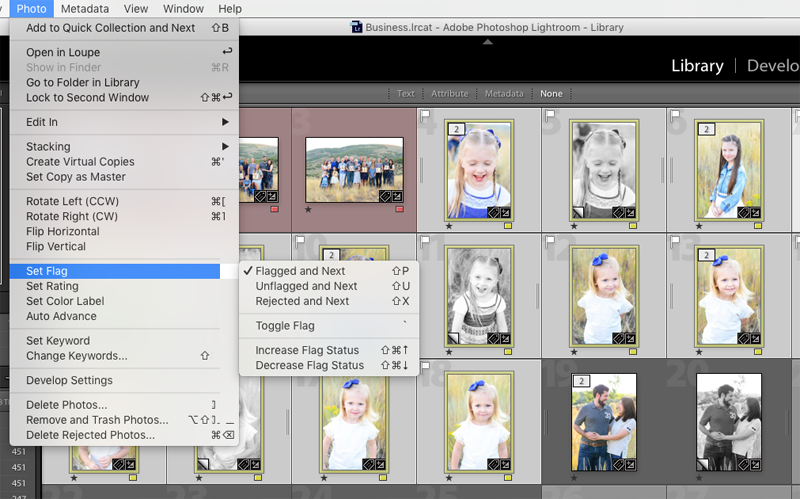
I can also select multiple photos in my Library module and go to Photo-Set Flag, Set Rating or Set Color-Label to assign my favorites all at once. See my example below. 

Back to the idea of rejecting photos: if you go to your menu and click Photo, at the bottom of this drop-down menu, you can delete your rejected photos. Lightroom gives you a choice to Delete from Disk (delete them forever) or just Remove them from your Lightroom catalogue. For me, if I don't want the photos, I like to delete them from my disk so they aren't cluttering my computer and taking up space. 

Hopefully you understand now that you can get to your favorite photos quicker and easier using these different sorting tools that Lightroom has to offer! I love how fast I can narrow down photos with these simple labeling tools. Try it out and see what works best for you. 


Simple Editing in Lightroom - Video Tutorial

Check out my quick video walk-through of how I edited this portrait! It doesn't take much to make your photos pop. Learn how to get this look in Lightroom by following my easy tutorial! 

Here's the Video Tutorial:


Understanding the Difference Between Lightroom and Photoshop

Last month we discussed some free photo-editing software and tools to get you started in the editing realm of photography. Today, I am going to build off of that to answer a question I hear every-so-often: What is the difference between Lightroom and Photoshop? Both of these programs are used widely by photographers; they have many similar editing tools but are also very different from each other. If you are gung-ho about doing some post-processing to your images and want a great software program, this post will give you a general, simple way to understand the tools both Lightroom and Photoshop have to offer, the differences between the two, and which one is right for you.

First, let's get right to the point and talk about the cost of these programs.

COST

Lightroom by itself costs about $150.00. To purchase or read more about Lightroom, check it out here. You can also buy Lightroom on Amazon for $142.00. The previous version of Photoshop (CS6) costs at least four times as much as that. Adobe does offer a new Creative Cloud program that will let you have both Lightroom and Photoshop for $9.99/month. This is great for businesses and individuals who use both programs a lot. It can be beneficial for you as well if you want to try them out and see how you like the programs. If you don't want to subscribe to use the software, you can still purchase Lightroom on it's own, or buy the cheaper and more simplified version of Photoshop, Photoshop Elements ($99.99 or $79.99 if you upgrade an older version).

Elements is similar to the full version of Photoshop, but not quite as powerful. It does offer the basic editing tools and is good for beginning-intermediate editing purposes. 

SO! If you want more editing options than basic free software programs but don't want to pay a ton of money, I would suggest going that route; either Lightroom or Photoshop Elements. 

SIMILARITIES 

Both programs handle multiple types of files, such as JPEG, PNG, TIFF, RAW and more. They both offer editing tools such as changing the crop, adjusting your exposure, contrast, and saturation, to working with brushes and curves. You can also go back in your history to review and change your editing as you go. 

DIFFERENCES

One of the key differences is that Lightroom allows you to edit non-destructively, meaning your original image will always be there. You can reverse your editing steps and/or save different versions of any photo without ever losing your original photo. You can always go back and start over with the un-edited version because Lightroom saves the changes you make as you go, in it's own kind of catalogue. This whole catalogue of images doesn't take up nearly as much room as the edits you would make and save on even one Photoshop file. PSD files can be huge! 

Photoshop is geared for those who need to edit very precisely pixel-by-pixel, working with files that have a lot of layers or combining different photographs into one (also called compositing). For example, this image I worked on below needed a lot of hands-on pixel-level spot removing, cloning, and composition of two images into one. For this work, Photoshop was very handy. 

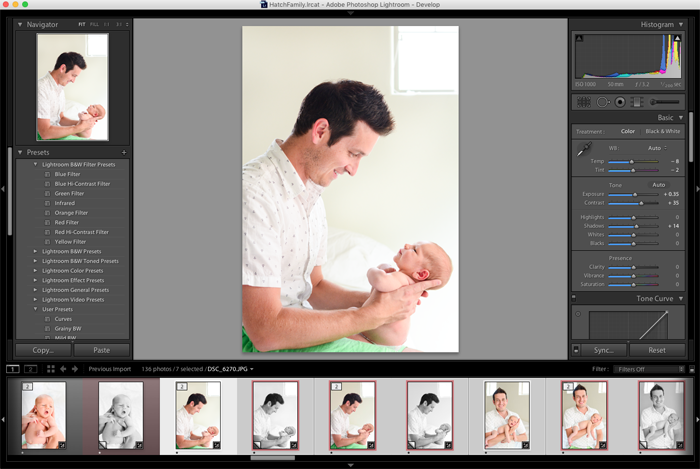
Lightroom provides simple one-click features to speed up the editing process, but also allows for advanced edits. I LOVE how easy it is to make edits to ONE photo, select a whole grouping of images shot in the same lighting/setting, and click 'SYNC' to apply all my edits to those photos at the same time with one click. This is called batch editing. I personally prefer Lightroom's way to do this over Photoshop's batch editing. For me, being a Mom and usually being pressed for time, Lightroom gives me a great way to edit a lot of images quickly. It also helps me keep my images organized. Who doesn't need more of that!? 

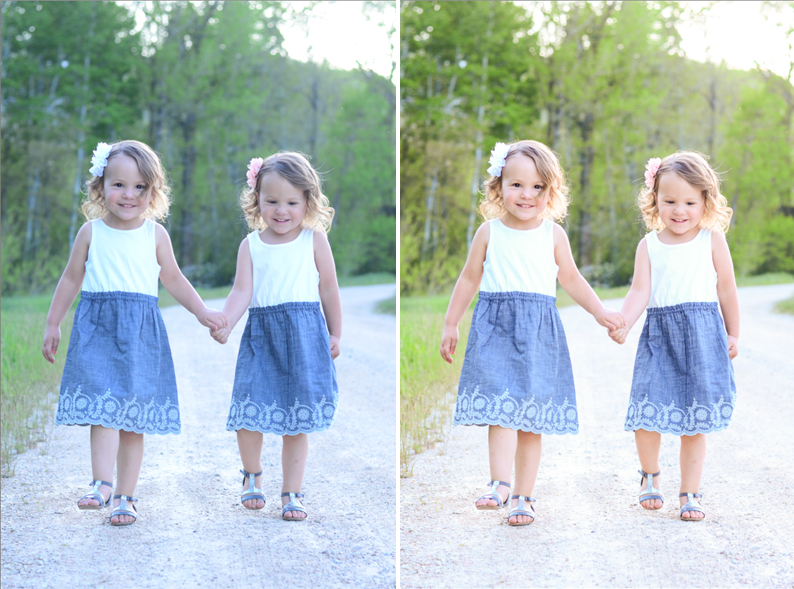
Here's a before and after example of an edit in Lightroom.

When it all comes down to it, I think of Lightroom as a FAST & EFFICIENT way to edit photos. Photoshop is more of a drawn-out process with a learning curve, but gives you more CONTROL. See the Photoshop window below; the bottom right corner is where you add layers and masks to make your edits. In Lightroom (the image above) you have sliders on the right hand side that make it a little easier to see your changes and actually know what your changing. 

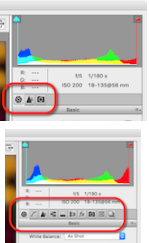
Photoshop elements is like Photoshop simplified, that allows shooters to use automated options and easy editing tools to jazz up and share photos. Elements has many of the same editing capabilities, but not everything is available. For example, both Photoshop Creative Cloud and Elements allow you to process RAW files in Camera Raw, but elements has limited options. See the example in the toolbar below. 

My greatest advice would be to download the free trials for both Photoshop Elements and Adobe Lightroom. If you need to, watch a few tutorials or just play around with both programs and see which one seems to fit your needs!