iPhone Tips

Travel Photo Tips - Rome and Paris

Get ready for photo overload! As promised, today's post is all about my trip to Europe. I hope you enjoy it and can learn a few useful tips for getting the photos you want when you are traveling. I'll also discuss how I balance shooting with my phone vs. my camera. 

I photographed my trip with three different cameras: my trusty iPhone 6s, my Nikon d7000 and my absolute favorite, a medium format film camera called the Hasselblad 500 c/m. Let's get one thing straight about me; I absolutely LOVE film. I used Kodak Portra 400 for the photos below. Unfortunately, purchasing and developing film can get expensive, and it is a more time consuming format when on-the-go, otherwise I probably would have easily shot 30 rolls on this trip! Here are a few of my favorites. 

Ponte Sant'Angelo - Bridge of Angels

Trajan Column & Heart of Rome

Colosseum Detail

Streets of Montmartre, France

Paris Street Artist

This is easily one of my favorite shots of my whole trip. This lady was so fun to talk to; I loved her accent, learning about her art background and techniques and hearing how her father also made a living as an artist in Montmartre before his old age. 

When shooting film, you have to be super careful to get the right composition, exposure and especially make sure you subject is in focus. I shot this at f/2.8 which was risky, but I really wanted the image to capture the essence of who she is. I didn't want any other faces to distract in the background, but you still see enough of the quaint streets and the majestic Sacre Coeur behind her. Luckily, I snapped it at the perfect moment when she had the expression I was hoping for. 


Moving on to some shots from my digital camera, I have to say that I LOVED having my wide angle lens for this trip! I use the Sigma 10-20mm lens which you can find here on Amazon. A wide angle helps so much when photographing landscapes, architecture and interiors. I was amazed at how much more I could get in my frame, especially when photographing inside cathedrals such as St. Peter's Basilica and Sainte-Chappel. It also allowed me to be close to a structure and still squeeze the majority of it in my frame. 

One thing to note is that many places you might visit are CROWDED! It is hard to get ideal photographs when there are literally hundreds, if not thousands of people in the way. I decided to embrace it and then get creative with my compositions in order to eliminate the distracting people. I honestly loved how in Rome, you'll turn a random street corner and HELLO! There's an incredible historic landmark right in the middle. So this photo of the Pantheon shows that reality. I might not frame it, but I want to remember how I felt when I first saw it. 

By walking closer and changing my composition, I'm able to get a good shot of just the Pantheon and nobody else in my frame. You don't have to settle; work around your scenario to get what you want! 

Remember when I mentioned THOUSANDS of people? It wasn't easy navigating our way down the Spanish Steps. A simple iPhone photo was fine enough here for me. 

It was fun to try and capture the culture and life in both Paris and Rome as well as photographing the main attractions. Look for details or side streets that catch your eye. I was also in love with the trees in Rome (see below). 

We walked through the Roman Forum (below) in the middle of the day when the sun was at its highest and harshest point. I decided to play around with my aperture and shot this at f/22 to tone the sun down. I then brightened the foreground of the image in post-processing in order to see more detail. If I exposed for the foreground here, my sky would have blown out to all white. Try and get off the auto setting and you can get some really fun results. 

Sainte-Chappel in Paris was easily my favorite cathedral. The 13th century stained-glass windows are absolutely breath-taking and are known as some of the best in the world! The entire structure is lined with fifteen huge panels; it's like a giant light box. 

The sun peeked through the clouds a few minutes after we walked in and completely changed the look and feel of the whole chapel. The light that flooded through brought the colors to life and the glow was amazing. I'll never forget it. Both of these photos were shot with my wide-angle Sigma lens; I didn't regret packing that one along that day. 

One huge benefit of carrying a DSLR on a trip is for photos at night. My iPhone images of this Eiffel Tower scene below are pretty much a laughing-matter. At night or in dark settings, phone photos can get so grainy and hardly hold any detail. It gets ten times worse if you try and zoom in at night. If you missed my previous post about my favorite travel tripod, the extremely small and affordable Pedco UltraPod II, check it out! I tried wrapping my little travel tripod around the fence at the top of the Arch de Triomphe but the fence wobbles too much to get a sharp long exposure. I had to reach through the fence and hold my camera by the strap (very risky, but I just couldn't resist!!) , and set the tripod on a ledge to get a steady surface for this shot. You just can't get this result with a phone camera.


Don't get me wrong, I love having an iPhone. So let's switch gears to my thoughts on iPhone photos! It was really nice to be able to tuck my camera away and make life easier by snapping a few iPhone photos whenever I wanted. It's light, fast and easy and for simple every-day memories, and for that, it does just fine. 

If you've followed my blog long enough, you will already know how much I love the panorama feature on the iPhone :) 

I also pair my iPhone with the app Snapseed to get better edited iPhone images. I highly recommend checking it out! Read my review of Snapseed here.

Well, that really is just a glimpse of what I saw while walking through the streets of Paris and Rome. Thanks for letting me get personal with this one, but I do hope I helped you get a step closer to getting better travel photos. Have a happy Friday and enjoy your weekend! 


How to Take a Vertical Panorama Photo on the iPhone!

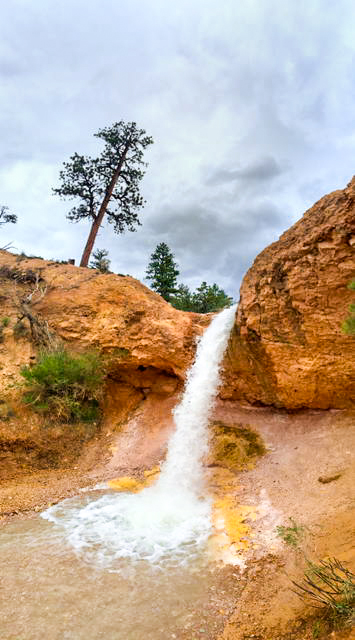
Some of you might know this already but I just had a breakthrough this weekend while in some really beautiful parts of the Utah desert! I figured out that you can easily take a vertical panorama photo on the iPhone! We were at this beautiful waterfall and when we hiked below it, there was also a huge pine tree above it. I was frustrated that I couldn't get a good composition of the waterfall AND the whole tree in one shot. Here's what it looked like:

I'm pretty sure right after I took this I said out loud, "Man, I wish you could take a vertical panorama so I could get that tree in my shot".

Then you know what I did? I turned my camera to the panoramic setting, turned my phone sideways to see what would happen and GUESS WHAT! It worked! haha. 

Here's my shot! It's WAY better, right? YAY!

To Take a Vertical Panorama:

  • Open your camera and select the panorama mode.

  • Turn your camera sideways.

  • Take the panorama as usual and press done when finished!

Sometimes I am the one learning as I go too :) Anyway, I was pretty excited about my discovery and thought I'd share the tip with you readers out there!! Take your iPhone landscapes to the next level with vertical panoramic photos.


iPhone & Android Photography App for Editing - Snapseed Review

Are you guys and gals ready for another fun photography app for your phone images? I have been playing around with Snapseed this week and I am surprised by how much I like it! It has been fun to play around with a few images and see what this app has to offer. I'm impressed. AND it is for both iPhones and Android phones. 

Go to the App store and download Snapseed to get a really easy to use and fun app to make your images brighter, edit selective areas on a photo, add vignetting, and have access to a ton of really great filters. I bet you'll love it too.

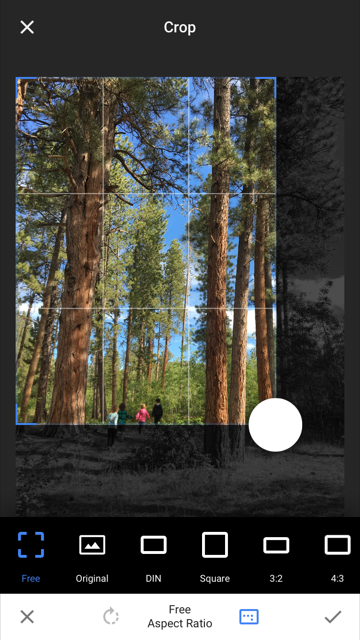
Once you have the app, go to Open. You'll then choose if you'd like a photo from your library, if you want to navigate which image to open on your device (instead of through the app) OR use your camera to take a photo.  

Here's the main screen with your tool options and your filter library. I love the choices we get to access here.

In every top left corner of each tool option, you'll see a question mark (?). If you click on it, the app will demonstrate how the tool works! It's pretty cool. Most edits you will slide your finger across the screen or up and down to change the setting. I like being able to see the change right when I move my finger. 

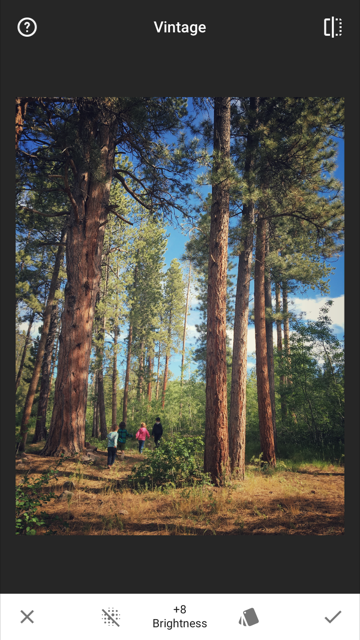
You can also selectively adjust the brightness, contrast and saturation, which is awesome!

They have a great library of filters; I like some of the vintage ones a lot! 

Give Snapseed a try and see if it gets you better edits on your phone! Take your iPhone and Android photos to the next level by taking some time to make them brighter, more clear and styled the way you like.


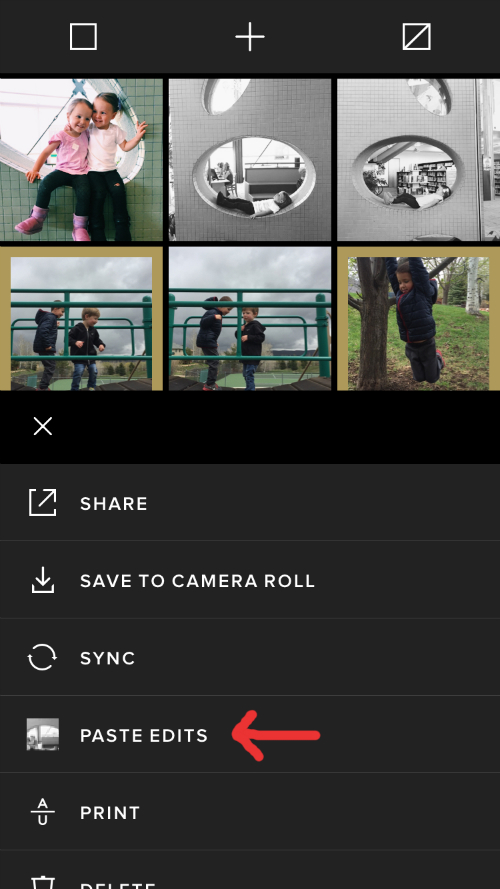
Quick Tip - Batch Photo Editing in VSCO Cam

It's Aloha Friday! I spent my teenage years living in Hawaii and every time Friday rolls around, I can't help but say it. We're still getting snow and it's almost May, which is making me miss the warm sunny days on the beautiful island of Maui. I miss that place. Sunshine or no sunshine, I am excited that the weekend is starting! 

Today I've been playing around with the VSCO Cam app and I just learned something AWESOME! I thought I'd share this quick tip with you today.

  • -PS and by the way, the VSCO Cam App is also available on Android phones, not just iPhones. If you haven't dowloaded it already, check it out!

Here's the fun tip: you can BATCH edit your photos on this app! Batch editing means you make your edits to one photo, and you can select as many photos as you'd like to add those same edits to. Click one button and it will automatically apply the same edits, all at once. Pretty sweet, yah? I used to end my sentences with 'yeah' all the time. It's a Hawaii thing...

How to Batch Edit Photos in VSCO Cam 

1. Select, edit and save your photo.

2. Click on the photo you edited and go to the menu button on the bottom right of your library screen (the three little dots). 

3. Click 'COPY EDITS'.

VSCO Cam Batch Editing Tips - Edit Multiple Photos at Once on Your Phone - www.mommatography.com

4. Now select the photos you want to apply your edits to (in the image below, you'll see your photos highlighted with a gold box). 

5. Go to the same three dot menu button, and click 'PASTE EDITS'. 

VSCO Cam Batch Editing Tips - Edit Multiple Photos at Once on Your Phone - www.mommatography.com

There you have it! All those photos will change to look the way your master photo does. Batch editing on your phone. I am loving this little trick.

Stay tuned and check in next week for my first GIVEAWAY! Have a great weekend!


Creating Black and White iPhone Images

It's time for another fun iPhone post! We've been learning a lot about DSLR tips so I figured we should make things simple and fun and switch back to iPhone photography. It is spring break after all! It is almost 70 degrees here; we are loving the warm sunshine. Bring on springtime. Bring on better iPhone photos.

If you're looking for another way to improve your iPhone photography, today's tips will help you create great black and white images with your iPhone. Once in a while I'll take a photo that is too harsh from really bright sunshine, and I won't like the way it makes the colors look. Or I'll want a photo to look a little more timeless or less distracting by having too many colors in my scene. This is where black and white comes to the rescue! It can often save a photo from being just... BLAH and make it more interesting by converting it to a black and white photo. Let's see how we can get this to happen. 

I made a quick video of how I like to convert my images to black and white JUST using my iPhone photo editor. This is quick and easy! First I'll show you a method starting with a preset B&W filter, and then a second method doing it from scratch.

Here's the before and after of this photo. I shot this in mid-day sun; I like converting images that are shot in harsh lighting conditions to black and white.

Converting iPhone Photos to Black and White - www.mommatography.com

Here's a perfect example of an image that looked kind of boring and the colors were yucky, but in black and white it looks much better. The contrast from my subject and the bright window behind him makes it much more interesting. 

Converting iPhone Photos to Black and White - www.mommatography.com

Sometimes I like the extreme contrast that the preset filters provide, but sometimes it can be too much. It all depends on the photo. Play around and see what you like!