Travel Photo Tips - Rome and Paris
Get ready for photo overload! As promised, today's post is all about my trip to Europe. I hope you enjoy it and can learn a few useful tips for getting the photos you want when you are traveling. I'll also discuss how I balance shooting with my phone vs. my camera.
I photographed my trip with three different cameras: my trusty iPhone 6s, my Nikon d7000 and my absolute favorite, a medium format film camera called the Hasselblad 500 c/m. Let's get one thing straight about me; I absolutely LOVE film. I used Kodak Portra 400 for the photos below. Unfortunately, purchasing and developing film can get expensive, and it is a more time consuming format when on-the-go, otherwise I probably would have easily shot 30 rolls on this trip! Here are a few of my favorites.
Ponte Sant'Angelo - Bridge of Angels

Trajan Column & Heart of Rome

Colosseum Detail

Streets of Montmartre, France

Paris Street Artist

This is easily one of my favorite shots of my whole trip. This lady was so fun to talk to; I loved her accent, learning about her art background and techniques and hearing how her father also made a living as an artist in Montmartre before his old age.

When shooting film, you have to be super careful to get the right composition, exposure and especially make sure you subject is in focus. I shot this at f/2.8 which was risky, but I really wanted the image to capture the essence of who she is. I didn't want any other faces to distract in the background, but you still see enough of the quaint streets and the majestic Sacre Coeur behind her. Luckily, I snapped it at the perfect moment when she had the expression I was hoping for.
Moving on to some shots from my digital camera, I have to say that I LOVED having my wide angle lens for this trip! I use the Sigma 10-20mm lens which you can find here on Amazon. A wide angle helps so much when photographing landscapes, architecture and interiors. I was amazed at how much more I could get in my frame, especially when photographing inside cathedrals such as St. Peter's Basilica and Sainte-Chappel. It also allowed me to be close to a structure and still squeeze the majority of it in my frame.


One thing to note is that many places you might visit are CROWDED! It is hard to get ideal photographs when there are literally hundreds, if not thousands of people in the way. I decided to embrace it and then get creative with my compositions in order to eliminate the distracting people. I honestly loved how in Rome, you'll turn a random street corner and HELLO! There's an incredible historic landmark right in the middle. So this photo of the Pantheon shows that reality. I might not frame it, but I want to remember how I felt when I first saw it.

By walking closer and changing my composition, I'm able to get a good shot of just the Pantheon and nobody else in my frame. You don't have to settle; work around your scenario to get what you want!

Remember when I mentioned THOUSANDS of people? It wasn't easy navigating our way down the Spanish Steps. A simple iPhone photo was fine enough here for me.

It was fun to try and capture the culture and life in both Paris and Rome as well as photographing the main attractions. Look for details or side streets that catch your eye. I was also in love with the trees in Rome (see below).


We walked through the Roman Forum (below) in the middle of the day when the sun was at its highest and harshest point. I decided to play around with my aperture and shot this at f/22 to tone the sun down. I then brightened the foreground of the image in post-processing in order to see more detail. If I exposed for the foreground here, my sky would have blown out to all white. Try and get off the auto setting and you can get some really fun results.

Sainte-Chappel in Paris was easily my favorite cathedral. The 13th century stained-glass windows are absolutely breath-taking and are known as some of the best in the world! The entire structure is lined with fifteen huge panels; it's like a giant light box.

The sun peeked through the clouds a few minutes after we walked in and completely changed the look and feel of the whole chapel. The light that flooded through brought the colors to life and the glow was amazing. I'll never forget it. Both of these photos were shot with my wide-angle Sigma lens; I didn't regret packing that one along that day.

One huge benefit of carrying a DSLR on a trip is for photos at night. My iPhone images of this Eiffel Tower scene below are pretty much a laughing-matter. At night or in dark settings, phone photos can get so grainy and hardly hold any detail. It gets ten times worse if you try and zoom in at night. If you missed my previous post about my favorite travel tripod, the extremely small and affordable Pedco UltraPod II, check it out! I tried wrapping my little travel tripod around the fence at the top of the Arch de Triomphe but the fence wobbles too much to get a sharp long exposure. I had to reach through the fence and hold my camera by the strap (very risky, but I just couldn't resist!!) , and set the tripod on a ledge to get a steady surface for this shot. You just can't get this result with a phone camera.

Don't get me wrong, I love having an iPhone. So let's switch gears to my thoughts on iPhone photos! It was really nice to be able to tuck my camera away and make life easier by snapping a few iPhone photos whenever I wanted. It's light, fast and easy and for simple every-day memories, and for that, it does just fine.

If you've followed my blog long enough, you will already know how much I love the panorama feature on the iPhone :)


I also pair my iPhone with the app Snapseed to get better edited iPhone images. I highly recommend checking it out! Read my review of Snapseed here.

Well, that really is just a glimpse of what I saw while walking through the streets of Paris and Rome. Thanks for letting me get personal with this one, but I do hope I helped you get a step closer to getting better travel photos. Have a happy Friday and enjoy your weekend!
Rome & Paris - Tips for Shooting Photos at Night
Buongiorno and bonjour! I am back! I took a small leave of absence for my very first trip to EUROPE (yay!), followed by making up time with the three little ones we left behind for almost two weeks. Needless to say, it has been quite an amazing month. I have always dreamed about walking along the streets in Europe. We spent five days in Rome and five days in Paris. It really was a dream come true, and I had the best time photographing while there. Talk about eye candy! Leaving both countries was hard to do, but October in Utah has been full of beautiful weather, fall leaves everywhere and fun activities with the kids. I needed some catch up time with them and it has been time well spent.
I hauled around my old film camera on our trip, my Hasselblad 500 C/M, which completely has my heart. Nothing can beat film in my mind and it made me pretty happy to shoot rolls of film again. In my next post I'll share with you more highlights from our trip and some of my favorites from my film camera!
Today I am going to give you a handful of tips for getting great photographs at night time. Whether you are traveling, shooting something close to home or just want to experiment, long exposures at nighttime can be SO fun. With a few helpful tips you can get great photos. Some things just come to life when the bright mid-day sun has gone to bed.
Tips for Shooting Photos at Night

Tip #1 - USE A TRIPOD!
When you want to take a photo in dim lighting, at night or any dark setting, you'll most likely have to do a long exposure. This means you need a sllloowww shutter speed to let more light record on your camera's sensor to actually have a photograph show up. If it's dark and you try shooting at 1/60th of a second, you don't have a lot of light coming through your lens. What happens when you start shooting at slower shutter speeds? CAMERA SHAKE! MOTION BLUR! Any movement to the camera will cause your image to be blurry. You MUST have some kind of tripod or still, flat surface to place your camera.
This photo of the Trevi Fountain in Rome is a good example of showing motion blur (the water is blurred from the long exposure) but the building is completely sharp and in focus! I simply placed my tripod on a post to get this shot.

When traveling, I always want to make sure I have a tripod to rely on. I bought this fun little Pedco UltraPod II Lightweight Travel Tripod on Amazon for only $18.95, and it's been so worth it! The head swivels so I can easily change my composition and it even comes with a strap you can wrap around poles or trees, etc. It folds down really small and is worth every penny. I love not having to pack a huge bulky, heavy tripod on a trip. Check it out.
Tip #2 - Use your timer!
I have found that if I'm using shutter speeds as long as one second or more, I can STILL have camera shake from my finger actually pressing my shutter release button to take the photo! I like to avoid the chance of a blurry image by using my camera's self-timer. That way I can guarantee I won't be touching or moving my camera at all and the photo should be pretty sharp. There wasn't much light around the Arch de Triomphe, so when I pressed my shutter release to take an 8 second photo, I could notice my slight camera shake. I had to set a timer to get it perfectly sharp!

Tip # 3 - Select a Higher f/stop Number
In the shot below of the Piazza Navona, you'll notice my lights turn into fun star shapes!

Everything I photographed on my trip at night was some kind of cool structure or scene; I wanted to be sure as much as I could see would be in focus and sharp, and I love the star effect. A higher f/stop number will allow this to happen. I shot this one at f/22. I usually shoot between f/8-f/22 for photos like this. The higher your f/stop number means you will need MORE light, hence the long exposures caused by the need for a long shutter speed. You'll also notice that the shot captures some motion blur lines from the people who walked by my camera while I took this photo. I think it is kind of fun and adds the life of the scene!
Go out at night time and give long exposures a try! It's a lot of fun to take long exposures at night. As for me, I am still having dreams at night of the food, culture and life in both Rome and Paris... I miss it so much already but am so grateful for the opportunity we had to be in two incredible places!
Intro to Shooting Backlit - 5 Tips for Beautiful Backlit Photos
When I was interning with the lovely Rebekah Westover, it was always humorous to see how many people wondered why she was shooting into the sun; clients thought that the sun should be on them, not behind them. They would ask, "Won't we all be dark?" The answer is... you will LOVE what is about to happen! Just you wait and see! Rebekah then continued to work her magic to produce stunningly gorgeous images for her happy clients, like these images of hers below.


Have you seen those beautiful, naturally-lit portraits where the light adds a perfect warm glow behind the subject? The secret is to shoot backlit! When your subject has the sun on their faces, its harsh lighting and nobody likes to try and smile with the sun in their eyes. Shooting into the sun, even if it's bright outside, helps avoid this AND can make for stunning results.
Check out my tips for getting great photos by shooting INTO the sun.
Here are my 5 tips for shooting backlit!
1. Shoot in manual mode. It's SO tough to get the right exposure (or that dreamy glowing feel) when you're shooting on a subject on auto, with the sun behind them. Your camera will try and calculate for the bright, bright sun and your subject and your image will most likely turn out too dark.

2. Spot-meter your subject. This will help you get the best exposure for your subject, not the contrasting values of your scene. You want your subject to be well exposed, and sometimes your background will go overexposed, but it will still be beautiful. For more about spot-metering and metering modes, click here. I also love shooting backlit indoors (shooting into the window light), like the photo below.

3. Use a lens-hood! When you have all that light coming into your lens, it helps to get more contrast with a lens hood; this can also help you to get just the right sun flares. Sun flare in certain photos can definitely add a great element but for some photos, it can block your subject too much or be overpowering. With a lens hood, even moving an inch can help you get the right look.

4. Use a custom white-balance setting. I love cutting down my post-processing steps by shooting in Kelvin. I get to add a warmer temperature in-camera to get the right glow that I want to go for! Shooting on an auto-white balance setting isn't bad, but most of the time my images come out cooler than I'd like them to be. You can also shoot on the daylight setting, which might be warmer than your auto setting. Play around with your white balance settings to see what you like best! Read more about understanding white balance in my article here.

5. Try and find the perfect lighting, just before the sun sets, and see if you can get rim light to show around your subject. This is where you can see the outline of light around the subject. I love this look!

Shooting into the light or into the sun is my favorite way to shoot. I love how it creates such a beautiful glow around any subject! Practice shooting this way and I can promise you, you won't want to go back :)
Sorting Photos & Creating Favorites in Lightroom
Today we're taking a trip back to learning more about Lightroom! Specifically, how to sort, rate and label your photos as favorites to make it easy on you to find and edit only the photos you pick. Be sure to read my first article about importing and organizing your photos in Lightroom here! This will help you import correctly and make sure your library is clean and correct.
One of the greatest benefits of Lightroom is not only do you have powerful editing tools, but you can store, sort and organize all of your photos in ONE place. You don't have to use Bridge to organize, and Photoshop to edit. LIGHTROOM gives you an all-in-one option. This is why I love it.
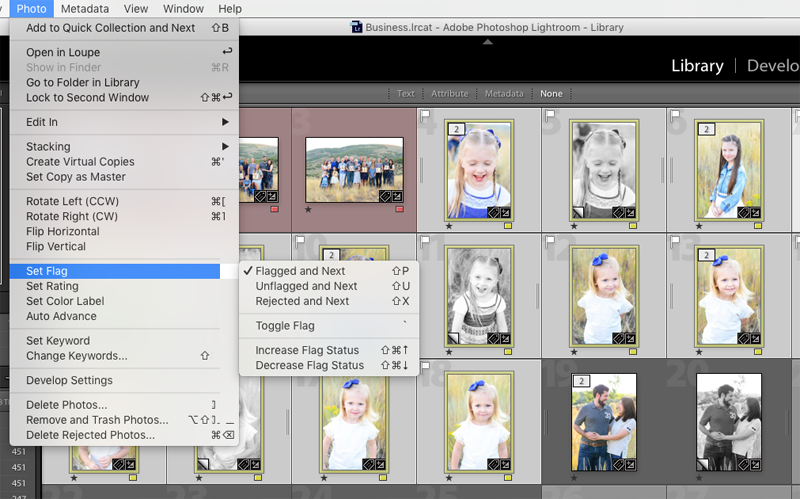
When I import a batch of photos through Lightroom, my next step is to sort through my photos and somehow label my favorites for further editing. Maybe you want to filter and label your photos by a certain location you were in, one specific event you imported or photos of only one of your kids. Lightroom makes this process SO simple! You can work with color labels, star ratings and flags. I like to flag the photos I want to edit. I'll go through all three processes with you and explain how to view ONLY those photos.

This image above shows my Library module, and you'll see that you can go to View-Sort- and choose how to view your photos based on this favorite system. Right now they are set to sort by Rating, but we can easily switch to your flagged Pick and Label Color.
How to Flag Photos in Lightroom
While clicking through photos, the shortcut to label a photo is the letter P. It will show you it's been flagged as a Pick.
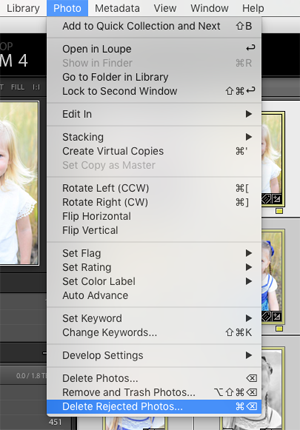
If I don't like the photo and want to delete it eventually, you can hit X to reject the photo.
How to Star (Rate) Photos in Lightroom
This is simple to remember, hit numbers 1-5 to set the number of stars you want to label photos. For example, if I want a five star label I'll just press the number 5.
If you want to get rid of a rating, just hit 0 to reset the rating to zero.
How to set Color Labels in Lightroom
Color labels start with the number six; 6-Red, 7-Yellow, 8-Green, 9-Blue and so forth. Simple press the number associated with the color label you'd like. These color labels might be helpful to organize photos into certain groupings for your to do list. Maybe red means keep it, and yellow means you want to print that photo.